January 19, 2012

Black & White 40th Birthday Invites

I am less then a week away from my big 40 black & white party.  I still have so many things to do before the big event.  But I wanted to give you a seek peek into the invites that were put together by me & my sister.  The hunt was on for the perfect style and what I was trying to accomplish.  Since I would be turning 40 I wanted to go with an elegant look.  When working on invites I try looking at many places before I choose paper or cards to work with.  I happen to find these ones in the clearance wedding section at a paper supply store for a complete set of 25 cards at the cost of $16.98.


My vision was made of using ribbon, damask paper, sparkly 40's and jewels.  The goal was to keep it simple, but still make a stand out card.  My sister had the lovely job of cutting the forties with her cricket machine and adding the sparkle.  Mine was to print the inside wording for the invites and assemble them together.  


Suggestion when shopping and making your own invites.  In vision what you would like to have.  If you can come close to what your looking for don't worry that it won't work or come together.  You have to complete the project before you can picture it.  I will be posting more of my party ideas and decor this coming week. 
Wish me luck that I get it all done in time.

January 13, 2012

Wedding Brownie Pop Bliss

We all know that the cake & brownie pop is one of the hottest raves to hit party and wedding dessert tables this decade.  I had the honor of making brownie pops for a wonderful friends wedding this weekend.  I have come up with one of the easiest ways to cut time & cost when making these delishes treats.


I use the following items for this task: 4 boxes of the big pack fudge brownies by Little Debbie's, 3 bags of white chocolate, 1 bag of navy blue chocolate, 100 white candy sticks and navy blue ribbon for bows. 


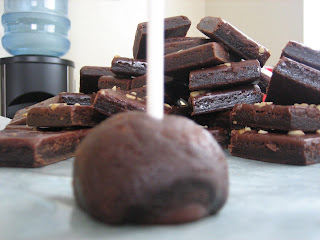
Gather together what you will need and start working.  I like to unwrap all the brownies first.  Cut in half and roll into little balls.  Once shaped place a candy stick in the center.  Before dipping in chocolate, I place the pops on a cookie sheet lying down and in the freezer for 15 to 20 minutes.  It makes it a lot easier to dip in chocolate and it helps to stay on the stick better. 


Out of the freezer and into the heated up white chocolate they go.  I bought a wonderful chocolate melting pot a few years back.  I suggest you purchase one if you work with chocolate.  Very carefully dip one at a time into the melted chocolate and swirl around to cover.  Pull up out of the chocolate and move the pop in a circle motion to help remove the extra chocolate.  Then place on wax paper to dry completely before decorating or doing a second coat if needed. 


 Please note not every brownie pop will come out pretty or one will even break.  But if you take your time they will come out great. 

For striping these babies I melted navy blue chocolate that I picked up from Standlee's on third in Chula Vista.  I used a pipping bag to make the lines.  You can also use specialty clear bottles that can be purchased at a candy or cake supply place for melted chocolate.  Leaving you with this final product. 
Please note that I made 96 brownie pops with this recipe.


I hope you enjoyed this tutorial..If you did please leave a comment or question if you have one...I will be happy to answer. 

 Up next is my 40th birthday party that I will be blogging ideas on the black & white affair that is coming up real soon.  Keep a look out to see what I have to share on invites, decor, food, dessert and much more. 

Until then have fun making these babies they are a joy to eat.