October 30, 2011

Chocolate Cupcakes, Rice Krispies Pumpkin Treats & Cake Brownies! Oh My!

As I promised this is a follow up to last weeks baking quest.  As the fall festival arrived for school last week.  I always volunteer for cupcake duty.  This time I wanted to do something different, so I decided to put chocolate creme filling in the middle for an extra surprise!

Having to get started first was to bake two dozen of cupcakes.  Which was the easy part since you only have to use a of box of cake mix.  Once cupcakes are baked and cooled you will want to place a hole in the middle.  You can use a round popsicle stick or skewer in a circular motion to create a well in the center.
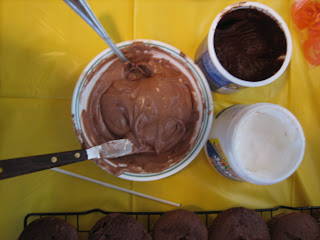
For the filling you will want to mix together one cup of chocolate frosting and one cup of marshmallow puff.  Place the mixture in a plastic ziploc bag or icing bag.  At the end of the bag cut a slit opening, not to big.  Stick the tip in the middle of the cupcake and squeeze until the filling comes out the top.

As you can see to the right the cupcakes filled to the top.  After that I just frosted and covered them with sprinkles and candy corns.  You can see the finish product below.  Just a note you can use any type of filling when doing this. 
The second project I worked on this weekend, was rice krispies pumpkins.
Here's how to get started, you will need to make rice krispies or buy them made already either one will work just fine.
 One tip if making you always want to make sure to butter up your hands to form the treats without sticking to your hands.  I shaped the mixture into round balls and placed them on sticks.  After I was finished I placed them in the freezer for about 10 minutes.  Why the freezer you ask, because the next step is dipping them in colored chocolate.  It's easier for the chocolate to stick and the treat to stay firm and not fall apart.  Please note you still will have a few rice krispie treats fall apart no matter what.  Don't be discouraged when you try it.

Melt chocolate as directed, I like to use my chocolate melting pot that I purchased from the store, which saves a lot of time.  You will also want to set up glass cups or sundae cups I like to use to hold the pops after you are done dipping in the chocolate.  It helps them to dry smooth all the way around. 
  Once they dried I was able to do my second step that was adding the stem on top.  Which was a tiny marshallow that was dipped in green chocolate by using toothpicks to dip and place them on top. 
This project does take time and patience, but they do come out cute.  In the back ground you can see ones I just drizzled with chocolate.  I like to try different types when I am experimenting.  Now all I have to do is wrap them up and give them out.

The last baking item of the night was my famous cake brownies.  I like to make these when I am going to a potluck or school event.  The reason for this is they are fast and easy, plus they taste so good. 
This is what you will need to make them:  One box of chocolate cake mix, one 4oz box of instant chocolate pudding, 2 cups of milk and a bag of chocolate chips.
First mix together instant pudding and milk only to dissolve the mix not to make it pudding like.  Second add in the cake mix.  Mix until everything is smooth and then fold in the chocolate chips.  Here's the tricky part place on a cookie sheet that is 13x9.  I like to place wax paper down first and spray it with cooking spray to help smooth out the mixture.  It may not look like enough but it is.  Believe me you just have to work on spreading it with a spatula.  Because once they start cooking they will rise and spread like a cake.  They should look this before they are placed in the oven at 350 for 20-25 minutes.

Once they are finish baking let them cool for about 15 minutes before cutting.  I also like to add a special touch by adding drizzled melted dark chocolate and white chocolate to give it an extra sweet bite.  This recipe makes about 40 brownies.  Here is what they look like when they are done.

I will follow up next this coming week with a gift idea for your teacher for November.  Until then try out some of these goodies.

October 24, 2011

Fall Treats

Fall has arrived people and its time to break out the oven mitts!  This is one of my favorite times of the year that I don't mind baking tell my fingers fall off.  I enjoy bringing a smile to children and adults with the goodies I make.  With Halloween around the corner my sister and I thought it would be nice to get together to make candy apples and sugar cookies.  What I didn't know was that I would be baking an apple pie too.


So off I went in search of the perfect apples.  I always like using granny smith apples because of there tarty taste.  Macintosh apples are just as good, so I purchased both kinds in large and medium.  I like to have a variety of different apple sizes on hand.  This year I decided to try caramel wraps that are ready to just fold over the apples straight from the package.  But I still bought two bags of my trusty caramel squares just in case.  My sister picked up chocolate melts, candy sprinkles and nuts for the outside of the apples.


As you can see I ended up using my two bags of caramels, I just wasn't feeling those caramel wraps.  Just don't get me wrong they just did not cover the apples the way I like them to.  Just a little hint because in the past I had a problem with caramel sauce being to runny.  I decided not to add water to the mix this year.  I just melted them in the microwave for 2 mins.  But do note you will need more bags of caramel if you are doing more then 5 apples.  The sauce becomes thicker and sticks to the apples really good without adding the water.  Make sure to use parchment paper with non-stick spray to place your apples on.  My sister had to laugh at me because the apples were sticking to parchment paper because I forgot the spray. I also suggest buying the round wooden sticks for the apples.  They go in much easier then the flat ones. 
 

The next thing on our to due list was sugar cookies.  My sister is going to hate me for telling you this but I used the bag mix.  Hey don't judge its easier then having to mix all kinds of ingredients together.  I only do it when I am in a hurry aka (lazy).  They come out just as good plus I make up for it with the decorating I do.  For frosting I use royal icing that does wonders for cut out sugar cookies.  For color I use food coloring or cake gels.  I like to make sure that my icing is thick. Don't add to much water to the royal icing mix, which can be found at any cake supply shop.  As mention before I love my Standlee's on Third Avenue, in Chula Vista. 


Finally the apple pie we used 6 granny smith apples slice thinly without the skin.  For crust we bought refrigerated pie crust from the supermarket.  Like I said this was an extra, no time for homemade crust.  In a bowl I combined one cup of sugar, 1/2 tbsp. of Cinnamon, a table spoon of flour, and a pinch of salt.  You can add a dash of lemon juice so the apples don't get brown.  Mix all together and place in pie pan with crust already lined at the bottom.  Slice small pieces of butter before topping with other pie crust.  You can choice to put a whole crust on top with cuts or criss cross dough on top.  Place foil around edges so they don't get burned.  Remove foil before the final 15 mins of baking to get brown.  I also added melt butter at that point and sprinkled with extra cinnamon and sugar.  It takes about 30-40 mins to bake with the oven at 350.  It came out yummy.      
As I forgot to mention about the candy apples once the caramel has set a little bit, you can melt the chocolate to drizzle over or add nuts and sprinkles.  We used cupcake liners on the bottom to protect the bag from access caramel.  Which is the final product below.  As I say keep it sweet & simple for a great outcome.  I will be back at the end of the week with fall festival cupcakes & a teachers fall gift idea.


October 23, 2011

"Hello Kitty" 7th Birthday Party

 
Who doesn't love "Hello Kitty" at any age.  My 7 year old thought this year it would be great to throw an all out hot pink hello kitty party with full candy buffet.  My lovely task was to keep in budget and get creative with the decor.  Which if you know me I am an all out girly girl who loves the challenge of making my 7 year old happy.  The first place to start was the dollar section at target which you can always find great supplies to add to the mix.  I purchased hot pink bins for $2.50 and small little boxes to use for candy for a $1.00 each, round coasters in purple and pink, jewels, picture frames and stickers for a $1.00 for the invites and decor.  Next I found wonderful clearance fringe hot pink and purple streamers .50 cents, bright color tissue paper for $1.99 to make flowers, pink table plastic clothe roller which was the most expense of $17.99 and goodies bag items all at Party City.  As you will see in the pictures all items came together once put together.  For invites I used colorful post note cards found for $5.99 for 50 of them at Marshell's.  I know your probably thinking why all the hassle of different places.  To keep things in budget it is always good to plan an event theme three to two months in advance so when you are out shopping you have time to pick up bargains.  


The party invites were made by hand in front with printable hello kitty's I found in a coloring book that I made copies of on hard white paper.  I colored the bows and glued on the flower cut outs I found at target.  They were hand written in front and I used a shipping label with the info printed out on back. 

     
I also bought clear glass jars from sprout's a health food grocery store for $1.99 each and the candy I was able to get a great price that my sister purchased at walmart in the Halloween section that was already out.
The goodie bags I just bought at Party City and used shipping labels that I created on the computer.  As you can see I also made hello kitty marshmallows that were pretty simple by using camp size marshmallows for the head, little marshmallows for the ears which you cut diagonal in half and royal icing for glue.  A black baker pin and big heart candy that can all be bought at a cake supply shop.  My favorite cake supply shop is a local business in Chula Vista, Standlee's you can also order on-line through there site
 The cake was made by my mother in law, who always does a fantastic job.  She stayed with the theme and made her own cake board with cello  wrap and sticker foam cut outs for decor.


 I purchased art paper at Marshall's for only $4.99  and had a friend draw character of the hello kitty gang that the kids could paint and dot color.  I purchase bingo doters and water colors at a teacher supply store. This was for one of the activities.

As mention early I bought a roll of plastic table clothe paper to use as the back ground around the party area and added the birthday sign with the flowers that we made to the decorating.

For food and drinks we kept it simple with pizzas from Costco, wings from KFC, fruit and veggie platter.  For drinks I bought lemonade, cherry limeade, and hawaiian punch all for less the cost then sodas and the kids loved that they could serve themselves from the dispensers.

My daughter was so happy that day with everything! Below is the candy buffet all set up.
.
And the last item on my list was ding dongs that I drizzled with hot pink chocolate and hello kitty sugar candies for the adults as a take home gift.  Let me tell you these were a hit, not one was left or the marshmallow kitty's.  As I say keep it simple, easy and cost effective for a great party.

Intro

I am so proud to get this blog up and running.  My sisters have been the driving force of great talent over the years.  I felt it was time to share with the rest of the world how wonderful and creative they really are.  I hope that what we share will inspire you to bring out your creative side.  Feel free to email your questions or ideas you like us to try or answer.  Thanks